LucyDream WordPress Plugin (FREE)
A WordPress plugin for AI-powered image generation and custom model creation, with a built-in payment and credits system, offering a seamless all-in-one solution for personal entertainment or business use.
Installation Guide
1. Create an API user account on LucyDream
1.1 Register or Log In to your LucyDream account.
1.2 Register your API user account.

1.3 Get your API key and fill in all the fields. To set up your Cloudflare account and get your R2 storage details, go to step 3.

Now you’re ready to download and install the LucyDream plugin on your WordPress website. Don’t have a WordPress website yet or need better hosting? Start here.
2. Install the LucyDream plugin
Important! To have Balance and Generated Images updated in real time, it is recommended to disable cache plugins (i.e. LiteSpeed Cache) from your WordPress site.
2.1 Log into your WordPress admin account.
2.2 Download the LucyDream plugins:
– aws-sdk.zip
– model-manager.zip
– lucydream-credits.zip
– lucydream-create-model.zip
– lucydream-image-webhook.zip
2.3 Go to Plugins in your admin panel and click on Add Plugin -> Upload Plugin.

2.4 Install and activate the plugins in the exact order as shown in Step 2.2.
3. Set up your Cloudflare account
3.1 Register an account with Cloudflare (it’s free).
3.2 Once logged in, click on your username in your top left corner to go to Account Overview

3.3 From the left-side panel click on R2 Object Storage, provide your credit card or PayPal details and click on ‘Add R2 subscription to my account’. Don’t worry, you will only be charged if you exceed the monthly limits (10GB of storage, 1 million Class A operations, and 10 million Class B operations free every month).
3.4 Click ‘+Create bucket’

3.5 Enter your Bucket Name. Leave Location on ‘automatic’ and Default Storage Class on ‘standard’.
3.6 Return to R2 Object Storage.
3.7 Click on ‘{}API’ next to the ‘+Create Bucket’ button and select ‘Use R2 with API’. Note your Account ID and bucket (storage) URL.
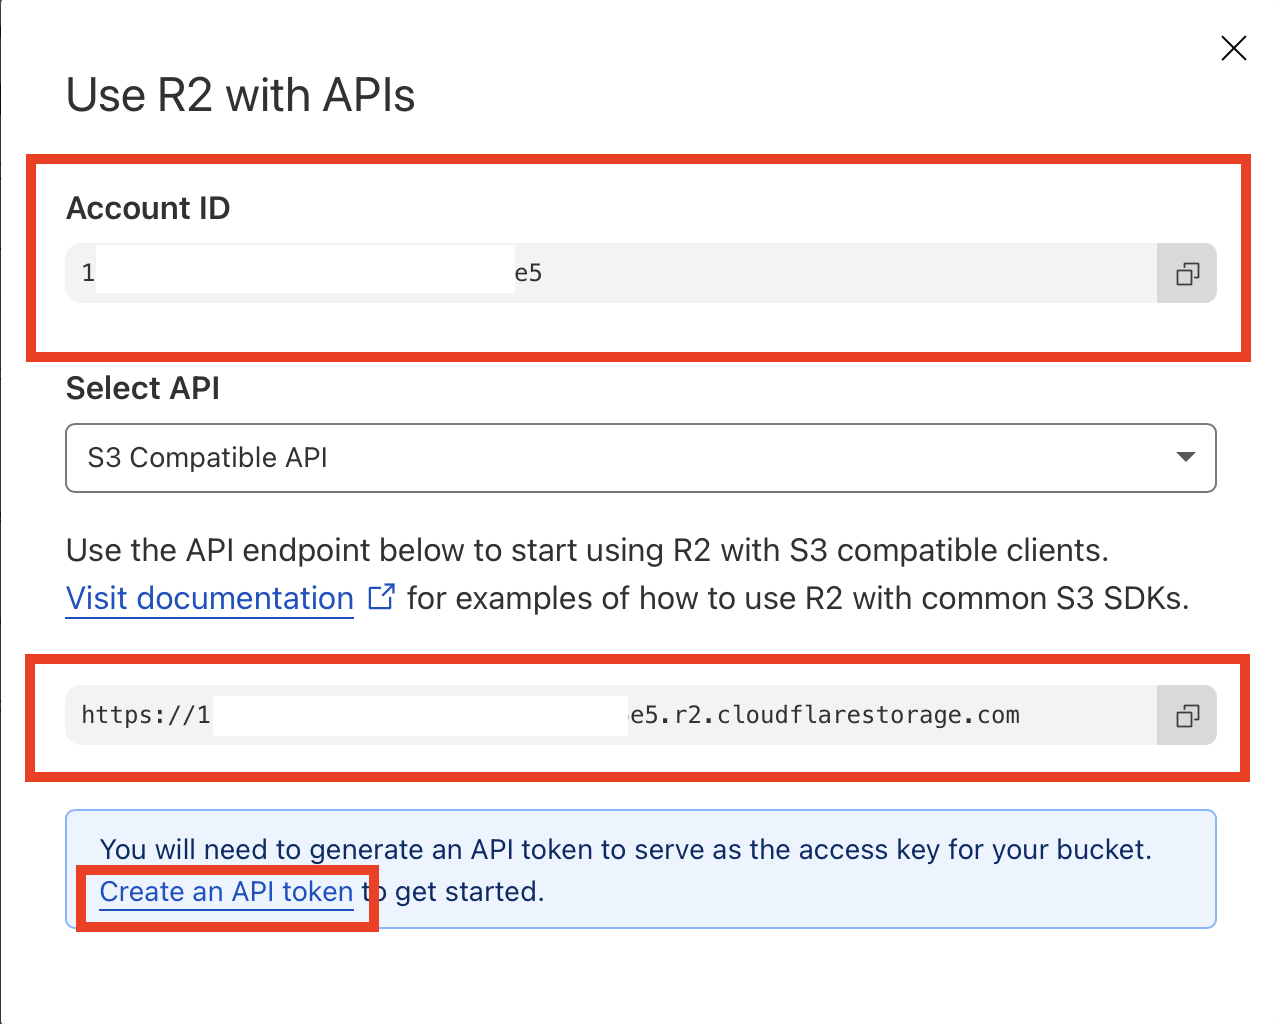
3.8 Click on ‘Create an API token’. Press the ‘Create Account API Token’ button. Under the Permissions section, select Object Read & Write. Under ‘Specify bucket(s)’ select Apply to specific buckets only. Choose the name of bucket you created from the dropdown list. Scroll down and press ‘Create Account API Token’.
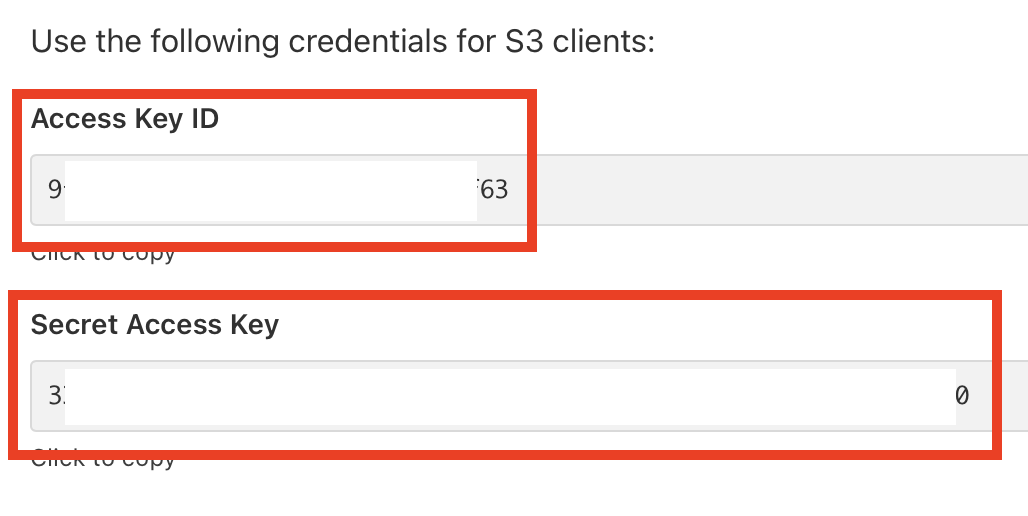
3.9 Note your Access Key ID and Secret Access Key.
Important! These token values will not be shown again. Be sure to save them somewhere safe before you proceed to the next step.
3.10 Provide these details in your LucyDream API dashboard (Step 1.3) and in LucyDream API Settings (Step 5.1) on your WordPress website.
5. Set up the LucyDream plugin
5.1 LucyDream API Settings
5.1.1 On the left side of your admin panel click Settings -> LucyDream API.
5.1.2 Fill in the same details for your R2 storage account as you did in Step 1.3. Make sure you already created your Cloudflare account as described in Step 3.

5.1.3 Type any strong secret key in the External Cron Secret Key field. You will need this when you reach Step 6.
5.2 LucyDream Payments
5.2.1 On the left side of your admin panel click Settings -> LucyDream Payments.
5.2.2 Set up your PayPal and Stripe environment. Choose Sandbox/Test for testing purposes and Live when you’re ready to accept real payments.
Important: you will need to log into your developer account with both PayPal and Stripe to complete this step.
5.3 Set Up Cost
5.3.1 Model Creation
5.3.1.1. From the left side of your admin, go to Model Manager
5.3.1.2 Adjust the cost in credits to create a model and press Save.

5.3.2 Image Generation
5.3.2.1 Within Model Manager adjust the cost per image generation by clicking on Edit under Actions.
5.3.2.2 Adjust the cost in credits per image generation and click Save Model.
5.3.3 Prompt Generation and Free Limits
5.3.3.1 Click on Model Manager from the admin panel and select Prompt Settings.
5.3.3.2 Adjust the cost per prompt generation and its free limit (type ‘0’ to remove free generations) and click Save Prompt Settings.
6. External Cron
6.1 Retrieve Ready Models
6.1.1 Register with an external cron service like Cron-job.org (it’s free)
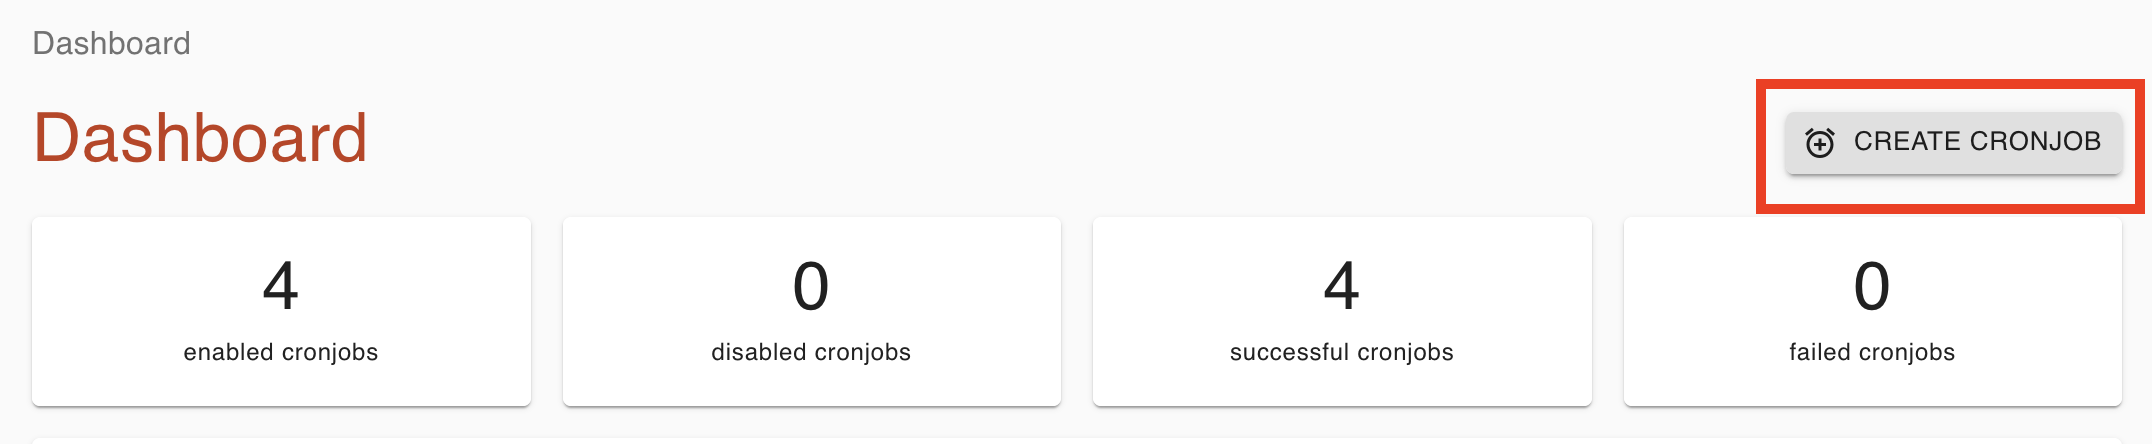
6.1.2 From your account Dashboard, click on ‘Create Cronjob’
6.1.3 Select a title (name) for your cronjob (ex. ‘Pending Models’).
6.1.4 In the URL field, include the https://, your website, and wp-json/custom/v1/trigger-pending-models
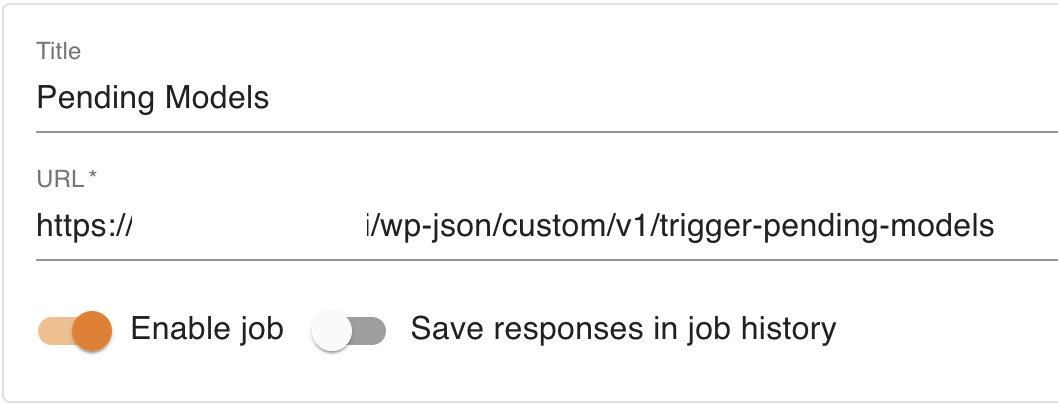
6.1.5 Set ‘Every 10 minutes’ (recommended) in Execution Schedule.
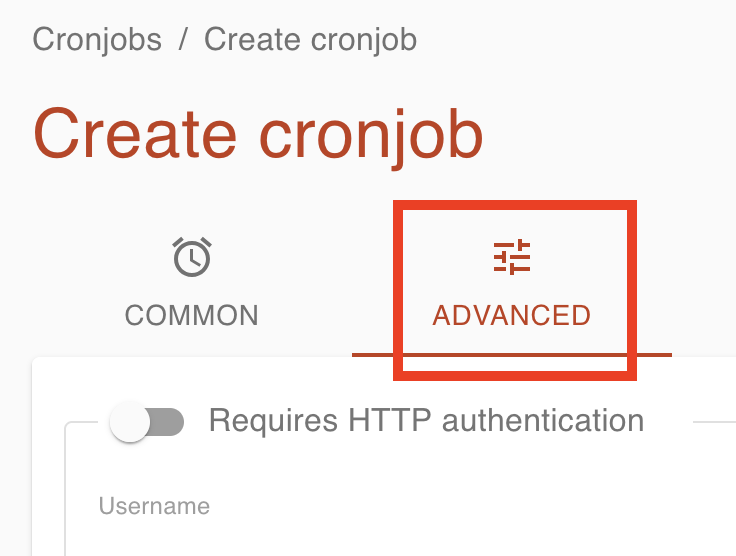
6.1.6 Switch to ‘Advanced’ tab.
6.1.7 In Headers click the ‘+ADD’ button and type Content-Type in Key and application/json in Value.

6.1.8 Change the request method to POST and provide your external cron secret key in the following format: {“secret”: “your-secret-key-here”} . Be sure to change your-secret-key-here to your actual external cron secret key that you set up earlier in step 5.1.3 . Press Save.

6.2 Delete Expired Models
Models will expire in 30 days since the day of creation and will no longer be available for image generation.
Setting up a separate external cronjob will help delete expired models and keep your R2 storage organised.
6.2.1 From your Cron-job.org Dashboard, click on ‘Create Cronjob’.
6.2.2 Select a title (name) for your cronjob (ex. ‘Expired Models’).
6.2.3 In the URL field, include the https://, your website, and wp-json/custom/v1/trigger-model-deletion
6.2.4 Set ‘Every 60 minutes’ (recommended) in Execution Schedule.
6.2.5 Switch to ‘Advanced’ tab.
6.2.6 Change the request method to POST and provide your external cron secret key in the following format: {“secret”: “your-secret-key-here”} . Be sure to change your-secret-key-here to your actual external cron secret key that you set up earlier in step 5.1 . Press Save.
7. Balance Top Up
To allow yourself and your registered users to create AI models and generate AI images, you have to have positive balance in your LucyDream account.
7.1 Log in to your LucyDream account.
7.2 Press the Buy Credits button next to your username, then click OK.
7.3 Complete the purchase.
7.4 Check on your available balance regularly and top up as needed.
Congratulations! Now you can start using your LucyDream plugin!
Important! If you need further assistance with the setup, send us an email.
8. Useful Features
8.1 LucyDream Credits
View all purchases and how users spend their credits.
8.1.1 To see all transaction details for your account, navigate to LucyDream Credits in your admin panel.
8.1.2 Click Refresh All to see all incoming payments and how credits have been used.
8.1.3 Use ‘Filter by:’ if you only want to see transactions of a specific type, from a particular User Id, Transaction ID, etc. Enter value in the text field next to it and press Apply Filters. Use multiple filters to narrow down your search results or click Remove to remove a filter.
8.1.4 To delete all or individual transactions, tick the box on the left from the User ID column, then click on the Delete button.
8.2 Manual Credits (Gifts)
Adjust user balance and add free credits.
8.1 Click on Users in your WordPress admin panel.
8.2 Find the user you want to adjust balance for and click on the amount under Balance.

8.3 Enter a new amount and press OK.